Renovation is exciting … especially once it’s over, as anyone who’s been through it will tell you. But when it is over, your home will suit you better, and its market value will likely be higher. Assuming the job is done right.
As a homeowner, you may have already brought in a plumber or an electrician for a specific job. But a significant renovation can cost a bundle and entail hiring and coordinating multiple specialized tradespeople over the course of weeks or months. In other words, it’s a whole different ball game.
So here’s a six-step guide to a topic that could be new (or maybe just fuzzy) to you: general contractors.
For the sake of your home, your equity, and your sanity, you might want one to handle your renovation for you. What is a general contractor? Do you really need one? How do you choose and work with one? Read on.
Step 1: Understand the role
What exactly do general contractors do? They organize and oversee a project as a whole. Some of a general contractor’s duties include:
- Estimate the entire project
- Negotiate with, hire, coordinate, and supervise subcontractors
- Establish a payment schedule and disburse the money
- Obtain permits
- Review plans and root out potential problems
- Order materials and schedule deliveries
- Troubleshoot
- Schedule inspections
- Ensure that everything is up to code
- Guide the job to completion at the quoted price
How do they get paid for doing all this? Usually by charging 10 to 20 percent of the overall cost of the project. Sound like a lot? See above list: it’s a pretty big job that can make or break a renovation. Oftentimes, they aren’t making that much.
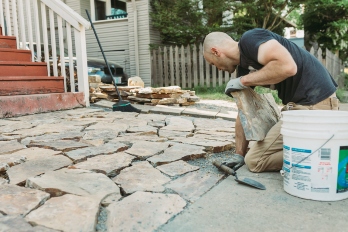
Step 2: Should you DIY?
The main reason most people decide to be their own general contractor is to save money. But if you’re not good at it, the project might not turn out as you envisioned, and you might spend more.
Questions to ask yourself:
- Is the job small to medium? You’ll very likely be in over your head on a large addition. A modest interior remodel is more doable.
- Do you have the time? Is your workplace close enough that you can run home when necessary? Are you available by phone most of the time?
- Are you a quick study? Contractors bring years of experience to a job. You’ll need to get up to speed fast as issues and decisions arise.
- Are you a great organizer and manager? A renovation can involve a lot of moving parts, dependencies, subcontractors, and suppliers.
- Are you prepared for the responsibility? If something goes wrong (more likely when you lack construction experience), it’s all yours to solve.
- Are you prepared to cover the financial risks? Depending on the project and how you finance it, you might need an insurance binder (temporary evidence of insurance).
- Are you ready to be responsible for subcontractors? You might need to buy extra liability insurance and workers’ compensation insurance.
If you answered yes to all of these questions, let Bob Vila help you explore the job in more detail.
If you answered no to any of them, proceed to step 3.
Step 3: Choose a contractor
Your choice of contractor is one of the most important renovation decisions you’ll make. Much more important than stone vs. composite countertops! You’re going to be trusting this person with your home and your money. You’re not a builder, after all. If a contractor starts cutting corners to line their wallet, you might not even know it. So:
- Start with referrals. Ask friends, neighbors, nonprofit housing agencies, and neighborhood associations about who they’ve hired.
- How did the job go? Any problems? Cost overruns or delays?
- How was the work quality?
- Did the contractor listen well, explain things well, and return calls quickly?
- Did they take care of any problems that cropped up after the job was complete?
- Talk to potential contractors. Start narrowing it down with interviews.
- How many jobs like yours have they done?
- What’s the average square-foot cost for a job like yours?
- Are they experienced with any special requirements or materials you have in mind?
- How will they keep things clean and safe while they work?
- Nix anyone who pressures you
- Get at least three bids or estimates.* Make sure they cover the same things, or you won’t be able to compare them very well. Here’s what a written estimate should include:
- Exact cabinets, hardware, flooring, etc.
- Waste removal plan
- Permit costs
- Installation costs
- General contractor fee
- How design changes will be handled
- Warranty of the work (a good contractor will offer this)
*Note: Estimates aren’t free for the contractor. Accommodate them as much as possible, and notify them right away if you choose someone else.
- Avoid “cost plus” or “time and material” bids. These arrangements can cost a ton, because there’s no ceiling on how much the contractor can spend. That should make you nervous!
- Be wary of low bidders. The contractor might be inexperienced, cutting corners, or desperate. The savings could disappear in one way or another.
- Ask for at least two references. They should be for work similar to what you need done. It’s not a bad idea to contact the Better Business Bureau or your attorney general’s office to see if any complaints have been filed against the contractor.
- Check credentials. Confirm that they are state licensed, bonded, and insured. Ask the contractor to provide a current certificate.
- Licensing: Requirements can vary by state, county, and municipality. Check with your state website and local building department. Electricians, plumbers, heating/air-conditioning professionals, and home improvement contractors are among the trained professionals who typically need a license to legally do their work. In most states, you can use license numbers to check for complaints at the Better Business Bureau.
- Bonding: In case something goes wrong, the tradesperson or company should be covered by a bonding company. That allows you to file a claim against them. Claims can include failure to complete the job, shoddy work, failure to pay for permits, theft, and more. Ask for a bond number and certification.
- Insurance: Liability insurance covers them if they damage your property. Workers compensation insurance pays injured workers for lost wages and medical care, regardless of who’s at fault. Without these in place, you run the risk of your personal homeowners insurance taking the hit. Ask for certificates of insurance and make sure the policies are current.
Step 4: Draw up the contract
It’s very important to have everything in writing. Expectations should be clear on both sides, including who pays if something goes wrong. BuildingAdvisor.com, a gold mine of information run by a design-build contractor with 40 years of experience, has a thorough, enlightening article on contracts that’s worth your time — all the more so if your renovation is big and you have a lot at stake. But here are the basics:
- Read every word and ask questions about anything you don’t understand
- Make sure it covers all the bases, including the following:
- The specifics of the work to be done
- The specifics on materials and fixtures
- The final cost or how it will be determined
- If a deposit is stipulated, it should be no more than 10 or 15 percent
- Change orders
- Quality standards
- Completion date
- General liability insurance
- Workers compensation insurance
- “Course of construction” insurance (possibly covered by your own insurer)
- Cleanup during and after
- Disposal costs
- When the work will be performed (time of day, weekends …)
- How delays will be handled
- Testing or removal of any hazardous materials
- Any rerouting of plumbing, ductwork, and wiring
- Repair of any damage inside or out by workers or construction equipment during the course of the job
- Responsibility for “hidden conditions,” e.g. a structural problem that wasn’t apparent until the job was underway
- Warranties and guarantees
- Understand what’s not included (uncommon in the contract itself, but at least get verbal clarity)
- Make sure it’s signed and dated
- Get a list of all suppliers and subcontractors
Step 5: Work with the contractor
Before the work starts:
- Again, make sure the contract is in order, and signed and dated
- Confirm that your contractor has all the permits in hand
- Make a communication plan: how and how often will you and the contractor communicate?
During the project:
- Watch for problems. But without interfering. Check things at the end of each day, for example. Are the cabinets that just got delivered in fact the style you specified? What’s that hole for?!
- Keep an eye on safety. Are children and pets out of harm’s way? If the work area relatively clean and orderly?
- Speak up. Be clear about what you want and question anything that concerns you.
- Pay on time. You’ll probably make payments during your project, as tasks are completed. Keep your contractor happy!
- Pay by check. So you can prove payment.
- Insist on lien waivers. Each time you make a payment, get a “lien waiver” (aka conditional release) from the contractor showing that the suppliers, laborers, and subcontractors have been paid. This prevents liens from being placed against your home for unpaid bills. Before your last payment, get a final lien waiver signed by each supplier and subcontractor.
- Track changes. Any departures from the initial contract should be put in writing and signed by both you and the contractor.
- Document problems. If there’s a serious problem developing, document it early and thoroughly, in as much detail as you can — you won’t necessarily know what’s relevant and what’s not.
Wrapping up:
- Don’t sign a completion certificate until all the work outlined in the contract has been done to your satisfaction.
Step 6: Enjoy the results!
It’s amazing what a difference a good renovation can make. An updated kitchen, a second bathroom, a mudroom addition, open space where there was a wall … you wonder how you did without them. If it was more of a repair project, the peace of mind that comes from checking a big one off your must-do list means a lot too. Be sure to thank your contractor by offering to serve as a reference.